Lisa Lacy Product Manager - Wave Petunias
One of the economical ways to fill your garden with Wave Petunias is to grow your own plants from seed. Many of our mail-order catalog partners sell Wave Petunia seed packets, and you often can find unique colours you may not find in stores.
If you’ve never sowed your own petunias before, or haven’t had wild success, the tips below should be helpful. Follow these guidelines and soon you’ll be planting your seedlings and enjoying bright colour in your garden.
When to start sowing
Your seed-starting time depends on the hardiness zone you live in. Hardiness zones determine your chance for frost – and frost will easily kill a young seedling. We generally suggest starting your Wave Petunias indoors about 10-12 weeks before the last chance of frost in your area. So once you determine that last frost date, count backwards those 10-12 weeks and you can plan to get started. What happens if you start too soon? Your seedlings may begin to stretch and out-grow their container, and could develop a weak structure since you won't be able to bring them outdoors in winter weather to harden them off (more on that below).
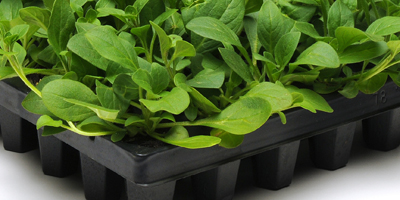
Sowing in seed trays
Sow your Wave Petunia seed into a moistened germination media or potting soil. Petunias benefit from light for best germination, therefore do not cover the seeds. Place the tray in a warm and bright location.
Fluorescent lights are suitable for a light source, both for germination and for growing on. Place the fluorescent light approximately 3-6 inches (7-15 cm) above the top of the tray. The lights can remain on for 14-16 hours per day. A timer may be helpful to turn on/off the lights. And though light is important, you don’t want to place the tray in direct sunlight.
For tray temperature, you’re looking for 70-75 degrees F (21-23 degrees C) at the soil level for optimum germination.
The seed tray should be kept moist, not soaking wet or dry. Misting the tray with a clean spray bottle is the best method to water in this early stage, as this does not disturb the seed. Check your tray daily and water when the soil looks dry on top and the trays feel light. Do not allow the tray to completely dry out. Here’s a quick tip: Covering the tray with clear plastic may help maintain temperature and increase humidity.
After germination
Once germination occurs and small green leaves (called cotyledons) are visible, remove the plastic cover. These early first leaves emerge in about 5-12 days.
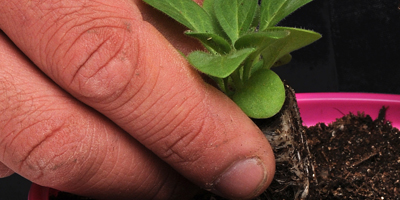
Keep your tray in the bright or fluorescent-lit area. The temperatures can start to cool, ranging from 65-70 degrees F (18-21 degrees C). Night temperatures can go down to 55 degrees F (12 degrees C). As the plants grow, and if you’re using fluorescent lights, move the light fixture up to maintain the 3-6 in. (7-15 cm) distance from top of plants. Once the young plants have between 4-6 sets of “true” leaves, it’s time to transplant them to individual pots or packs.
Finishing time
Keep the fluorescent lights over the young plants as described above and continue to monitor for moisture. While you don’t want the soil to completely dry out, you’ll want to wait to water until the soil is light brown and the container feels light when picked up. Then you can water thoroughly, allowing water to run through the bottom of the transplant pot or pack.
Now it’s time to feed your seedlings! Fertilise with a liquid feed weekly, following the instructions on the package. Soon your plants will be established with roots growing to the edge of the pot. To determine this, gently pull plants and soil away from the container to check for root growth.
Once your roots are strong, your plants can then be “hardened off.” Move the plants outside on sunny and warm days. Bringing them inside at night will help acclimate the plants and will protect them from frost and prepare them for planting. During this step, be sure to maintain the water and fertiliser regime as described above.
Finally, after all your hard work of growing small seedlings into young plants, your new Wave Petunias can be planted outside or in patio containers once any danger of frost has passed.
If you’re planning to start Wave Petunias from seed this year, let us know! Comment below and share your seed-starting stories – successes and frustrations. And be sure to send photos of your seedling adventures to fanclub@wave-rave.com.